Three-Limbed Forward Fold (Triang Mukha Eka Pada Paschimottanasana): Sitting Level on Both Hips
After the lotus-based fold of the previous posture, the Primary Series gives you something that looks simpler and turns out to be quietly demanding: one leg stretched forward, the other folded back beside the hip. Triang Mukha Eka Pada Paschimottanasana is where most beginners discover that a forward fold can be ruined long before the hands reach the foot. Here is the shape, the one prop that changes everything, and how to keep the bent knee out of trouble.
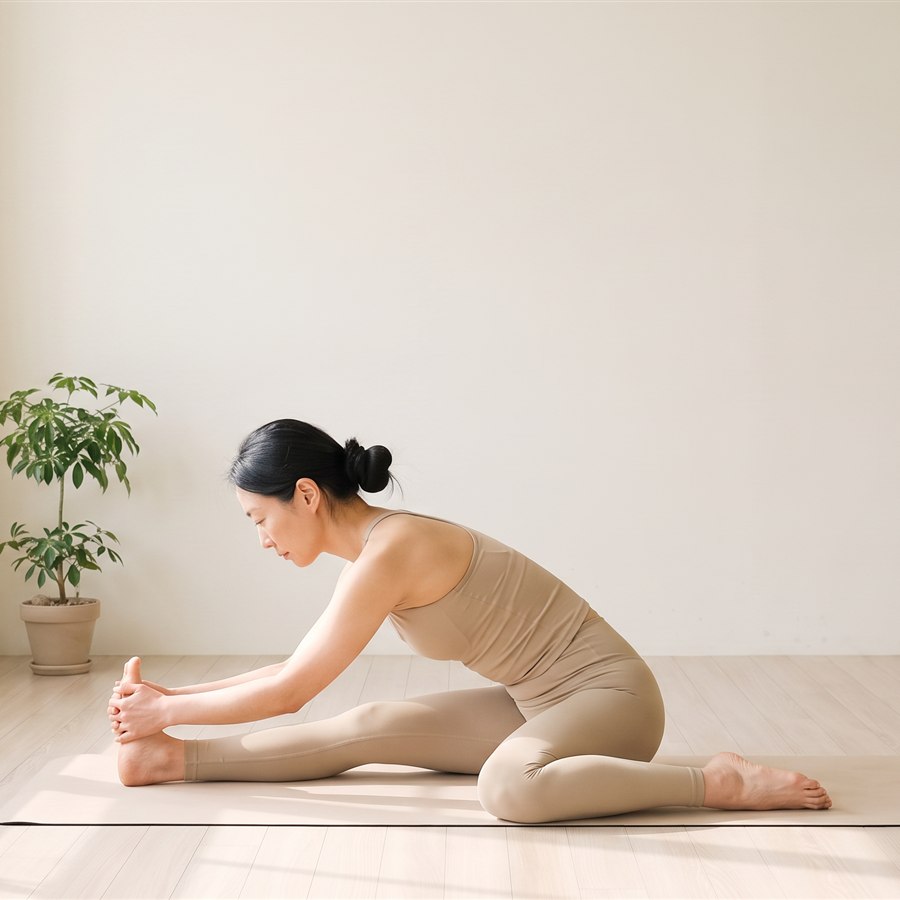
Triang Mukha Ekapada Paschimottanasana - one shin folded back beside the hip, both sitting bones pressing down evenly
What is Triang Mukha Eka Pada Paschimottanasana?
The name is long but it is simply a description. Tri is three, anga is limb, mukha is face, eka pada is one foot or one leg, and paschimottanasana is the intense stretch of the back body — literally the "west side" of the body, the whole line from heels to skull. Put together, the title points at three parts of the folded leg — knee, shin and foot — turned back and facing the same direction, while the fold itself happens over the single extended leg.
Functionally this is an asymmetrical forward fold. One hamstring lengthens while the opposite knee goes into deep flexion and the opposite ankle stretches along the top of the foot. That combination is why it feels so different from the symmetrical Seated Forward Fold you met a few posts ago: the hamstring stretch is only half the work. The rest is pelvic honesty — refusing to let the body dodge the stretch by tipping sideways.
Practitioners commonly report that over a few months the folded leg's knee and ankle grow more comfortable in deep bends, which pays off later in the lotus-based postures. They also start to notice their own asymmetry: one side folds easily, the other argues. That is information, not a problem to fix in a week.
Step-by-step: getting into the pose
In the counted method you arrive by jumping through from Downward Dog; at home, simply sit down in Staff Pose and begin. Hold five breaths per side. Traditionally a full vinyasa separates the sides, but changing legs directly is a reasonable place to start.
- Sit in Staff Pose with both legs straight, spine tall, palms beside the hips.
- Bend the right knee and fold the right shin back so the right foot rests beside the right hip, sole facing up, top of the foot on the mat.
- Check the right foot: the toes should point straight back behind you, in line with the shin, not splaying outward. Draw the right heel in until it lightly touches the outside of the hip.
- Keep the left leg active — kneecap facing the ceiling, toes drawing back toward you, heel pressing away.
- Now the important part: press the right sitting bone down toward the floor. The body's instinct is to tip left, onto the straight-leg side. Resist that and keep both hips level.
- Inhale and reach both arms up, lengthening the whole spine from the pelvis.
- Exhale and hinge forward from the hip joints, not the waist, and catch the left foot with both hands. If the foot is out of reach, hold the shin, the ankle, or a strap looped around the sole.
- Inhale, lift the chest and straighten the arms slightly, lengthening the front of the body.
- Exhale and fold, bending the elbows out to the sides and bringing the chin or forehead toward the shin. Keep the right sitting bone heavy.
- Stay for five slow breaths. Inhale to lift the head and torso, then release, change sides, and repeat with the left shin folded back.
Breath and gaze (drishti)
The breath is the same Ujjayi breathing you built in the early posts of this series: a soft, audible, even flow through the nose with a gentle narrowing at the throat. Here it has a specific job. Each inhale is a chance to lengthen the spine a little; each exhale is the only time you should allow yourself to deepen the fold. If the breath goes silent or ragged, you have gone past the edge of the pose — back off until it is audible again.
The drishti is padayoragrai, the toes of the extended foot: the gaze travels along the straight leg toward the big toe. If your forehead has come down and the toes are out of sight, keep the gaze soft and unmoving in that same direction. Do not crank the neck to see the foot — the drishti is a direction for the attention, not a target to hit.
Common mistakes
Four things go wrong here far more often than anything else.
- Tipping onto the straight-leg hip. This is the big one, and it is almost universal. The pelvis slides toward the extended leg, the folded-leg hip lifts off the mat, and the spine curves sideways. The fold then feels available, but the hamstring is barely stretching and the lower back is twisting. Fix: put a folded blanket under the sitting bone of the straight-leg side and actively press the folded-leg hip down.
- Letting the bent foot splay outward. If the foot sickles out to the side, the knee twists and the inside of the ankle takes a strain it was not built for. Fix: before folding, reach back and physically place the foot — toes pointing straight behind, shin lined up with the thigh, heel touching the hip.
- Pulling the head down with the arms. A beginner who hauls on the foot rounds the lower back and shortens the front of the torso, which actually reduces the hamstring stretch while loading the lumbar discs. Fix: think of sending the breastbone forward past the knee rather than the forehead down to the shin, and let the arms be a connection, not a winch.
- Pushing through knee pain. Deep knee flexion plus the pull of the arms is a combination that can turn a quiet knee into a sore one. Stretching in the thigh and ankle is fine. Sharp, pinching or lateral pain in the knee joint is not. Fix: come out, and use one of the modifications below.
Beginner modifications
The prop list here is short, because one prop does most of the work.
- A folded blanket under the opposite buttock. Place it under the straight-leg side so the pelvis sits level. This single change makes the pose honest, and almost everyone needs it for the first months.
- A rolled towel under the bent ankle. If the top of the foot or the front of the ankle complains, a small roll under the ankle takes the edge off.
- A strap around the extended foot. Hold the strap with both hands, keep the spine long, and fold only as far as the back stays long. Reaching the foot is not the point.
- A softly bent extended knee. Tight hamstrings pull the pelvis into a backward tilt. Let the straight knee bend a little so the pelvis can tip forward, which is where the fold actually comes from.
- Sit on a folded blanket. Elevating both sitting bones a couple of inches helps the whole pelvis rotate forward and is useful for anyone whose lower back rounds the moment they sit on the floor.
- Less knee bend. If full flexion is not available, let the heel sit further from the hip and keep the fold shallow. Over weeks the knee softens.
When to be careful
Be cautious or skip the folded-leg side if you have a current knee injury — particularly meniscus or ligament trouble — because deep flexion with weight on it is exactly the position that aggravates both. Ankle sprains and foot injuries also deserve respect: rest the shin on a bolster or practise the extended-leg fold only. If you have a hamstring strain, keep the fold shallow and the knee slightly bent, and stop well before the sharp point in the back of the thigh. With disc problems or sciatica, keep the spine long rather than rounded and treat any tingling down the leg as a signal to come out. In pregnancy this asymmetrical seat gets uncomfortable early; an upright seated side stretch is a kinder substitute. If you get dizzy coming up from folds, rise slowly on an inhale.
Where it fits in the practice
You now have three seated folds in a row that teach the same lesson from different angles: the two-legged fold of Paschimottanasana taught you to hinge from the hips, Ardha Baddha Padma Paschimottanasana asked the knee to rotate, and this posture asks the pelvis to stay level while one hip is tilted. Everything that comes next — the head-to-knee family, the Marichyasana binds — builds on those three skills. If practice time is short, five honest breaths per side with a blanket under the hip beats a deep-looking fold on a tipped pelvis.
🧘 Want to practice this pose right now? Open our interactive guide with photos, alignment details and a breath timer: Ashtanga Shala Practice Guide.
Keep that blanket within reach for the rest of the seated sequence — it has more uses ahead. In the next post we move on to Janu Sirsasana A, the first of the head-to-knee postures, where the folded leg opens out to the side and the ninety-degree angle at the knee becomes the whole story.
This post is general guidance, not medical advice. If you have an injury or health condition, check with a professional before practicing.


