Intense Side Stretch (Parsvottanasana): Square Hips, Long Spine, Honest Fold
Parsvottanasana is the last of the standing forward folds in the Ashtanga Primary Series and, quietly, the strictest of them. It comes right after the four Prasarita Padottanasana variations, and it takes everything they taught you about folding from the hips and asks you to do it with one foot in front of the other, hips facing squarely forward, and hands pressed together behind your back. Nothing about it is dramatic to look at. Almost everything about it is difficult to do honestly.
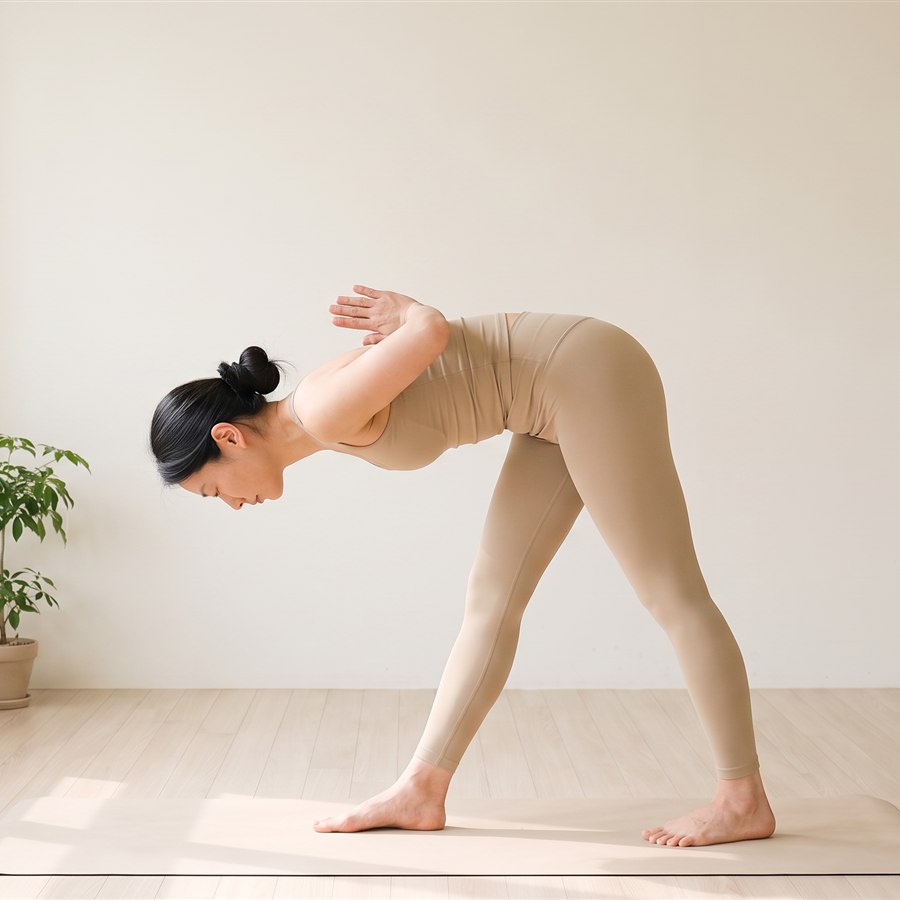
Parsvottanasana - hips square to the front foot, spine long, hands in reverse prayer
What is Parsvottanasana?
Parsva means side or flank, ut is an intensifier, and tan means to stretch. Intense side stretch. The name is slightly misleading for beginners, because the stretch you feel is not along the side of the torso, as in a side bend, but along the back of the front leg and through the whole length of the spine as it reaches forward over that leg. The "side" refers to the fact that each side of the body is worked in turn.
What makes the pose different from the wide-legged folds before it is the pelvis. In Prasarita Padottanasana both feet point forward and the hips square themselves without effort. Here the feet are staggered, one about a leg's length in front of the other, and the back foot is turned out. Left alone, the hip of the back leg drifts backward and the fold becomes a lopsided twist. The work of the pose is to keep both hip points facing the front foot while the torso folds, and that is a demand on hip mobility that many beginners meet for the first time in this pose. Practitioners often notice that regular practice leaves the hamstrings longer and the hips more even, and that the reverse prayer position gradually softens tight wrists and shoulders.
Step-by-step: getting into the pose
- From Samasthiti, inhale and step or jump the feet apart to the right, so you face the long side of the mat, about one leg length between the feet.
- Bring the hands behind the back, palms together, fingers pointing up between the shoulder blades in reverse prayer. If that is not available, hold opposite elbows or opposite wrists behind the back instead.
- Turn the right foot to face the short end of the mat and the left foot in by about 45 degrees. Turn the hips and chest to face the right foot. Both hip points should now point the same way as the front toes.
- Inhale and lift the chest, drawing the shoulder blades back and lengthening the front of the spine. Gaze up.
- Exhale and hinge forward from the hips over the right leg, leading with the chest. Let the chin move toward the shin only as far as the spine stays long. Keep the back heel heavy on the mat.
- Hold for five breaths. Gaze at the toes of the front foot.
- Inhale and come up with a long spine, keeping the hands where they are. Turn the feet to the left and repeat the same steps on the other side.
- After the left side, inhale to stand, exhale and release the hands, and step or jump back to Samasthiti.
Notice that the hands are set before the feet turn. That order matters. Setting the reverse prayer first, while the shoulders are still relaxed and the chest is open, is far easier than trying to wriggle the hands into place after you have folded.
Breath and gaze (drishti)
Keep the ujjayi breath steady and slightly longer on the exhale. Each exhale is an invitation to fold a little more from the hips; each inhale is a reminder to keep the chest broad and the spine long, rather than collapsing further. In a pose held only five breaths per side, that rhythm is your whole timeline: lengthen, fold, lengthen, fold.
The drishti is the toes of the front foot (padayoragrai). Keeping the gaze on the toes helps with something practical: it stops you from curling the head down toward the knee in an attempt to look folded. The chin moves toward the shin only when the fold from the hips has brought it there.
Common mistakes
Letting the back hip fall away. This is the mistake the whole pose exists to correct. The hip of the back leg drifts backward, the pelvis opens to the side, and the fold turns into a twist. The fix is to draw the front hip back and the back hip forward before you fold, and to check again halfway down. If you cannot keep the hips square with a straight front leg, bend the front knee slightly. A square pelvis over a soft knee is the real pose; a straight leg over a twisted pelvis is not.
Rounding the upper back to reach the shin. The chest caves in and the shoulders roll forward, which also makes the reverse prayer slip apart. Think of leading with the breastbone rather than the forehead, and stop where the length of the spine stops.
Lifting the back heel. When the hamstring of the front leg feels stretched, the back heel quietly floats off the mat to relieve it. Press it down; the back leg is what keeps the hips honest.
Forcing the reverse prayer. Jamming the palms together with the wrists bent sharply can strain the wrists for very little gain. The hand position is an accessory to the fold, not the point of it.
Beginner modifications
Shorten the stance. A shorter distance between the feet makes it much easier to keep the pelvis square and the back heel down. Start shorter than you think you need and lengthen it over weeks.
Change the hands. If reverse prayer is not available, hold the elbows or wrists behind the back. If even that pulls the shoulders forward, place the hands on the hips, or bring them to blocks on either side of the front foot. Hands on blocks lets you focus completely on the hip alignment, which is the harder and more important skill.
Bend the front knee. A small bend in the front knee protects a tight hamstring and makes it far easier to keep the hips level. Straighten the leg gradually over many practices, never in one.
Use the wall. Practice with the back heel pressed against a wall. The wall gives immediate feedback if the heel lifts and makes the back leg feel anchored, so the pelvis has something to square against.
When to be careful
A hamstring strain means keeping the front knee bent and the fold shallow until the leg is fully healed. If you have a wrist or shoulder injury, skip reverse prayer entirely and use blocks; there is no benefit to forcing it. Anyone with a low back problem, including a history of disc issues, should fold only with a long spine and stop well before the back rounds. During pregnancy, use a wider stance, keep the hands on blocks, and fold only halfway. If you have high or low blood pressure and feel light-headed with the head below the heart, come up slowly and keep the fold shallow.
Why the hips matter more than the fold
Every pose in the standing sequence trains something that the seated sequence will need. Parsvottanasana trains a square pelvis over a straight front leg, which is exactly the shape of the seated forward folds you will meet a few weeks from now, only turned upright. If you learn here to fold from the hips rather than the waist, and to keep both hip points level even when the hamstring complains, those later poses will feel familiar rather than foreign. That is why it is worth spending time on this unglamorous pose, and worth doing the shallow, honest version rather than the deep, crooked one.
🧘 Want to practice this pose right now? Open our interactive guide with photos, alignment details and a breath timer: Ashtanga Shala Practice Guide.
Take the shorter stance, keep the heel down, and fold only as far as the hips stay square. In the next post we move on to Utthita Hasta Padangusthasana, the first standing balance in the series, where the same standing leg you just trained will have to hold you up on its own.
This post is general guidance, not medical advice. If you have an injury or health condition, check with a professional before practicing.

