Head-to-Knee Pose A (Janu Sirsasana A): The 90-Degree Knee That Makes the Fold Work
Janu Sirsasana A is the moment the seated sequence stops being symmetrical for good. Paschimottanasana folded you forward over two long legs, and Triang Mukha Eka Pada Paschimottanasana asked you to stay level while one knee folded behind you. Now the bent leg turns the other way — outward, into the open — and you fold over the leg that is still long. It is the first of three head-to-knee variations, and the shape you build here is the one the other two depend on.
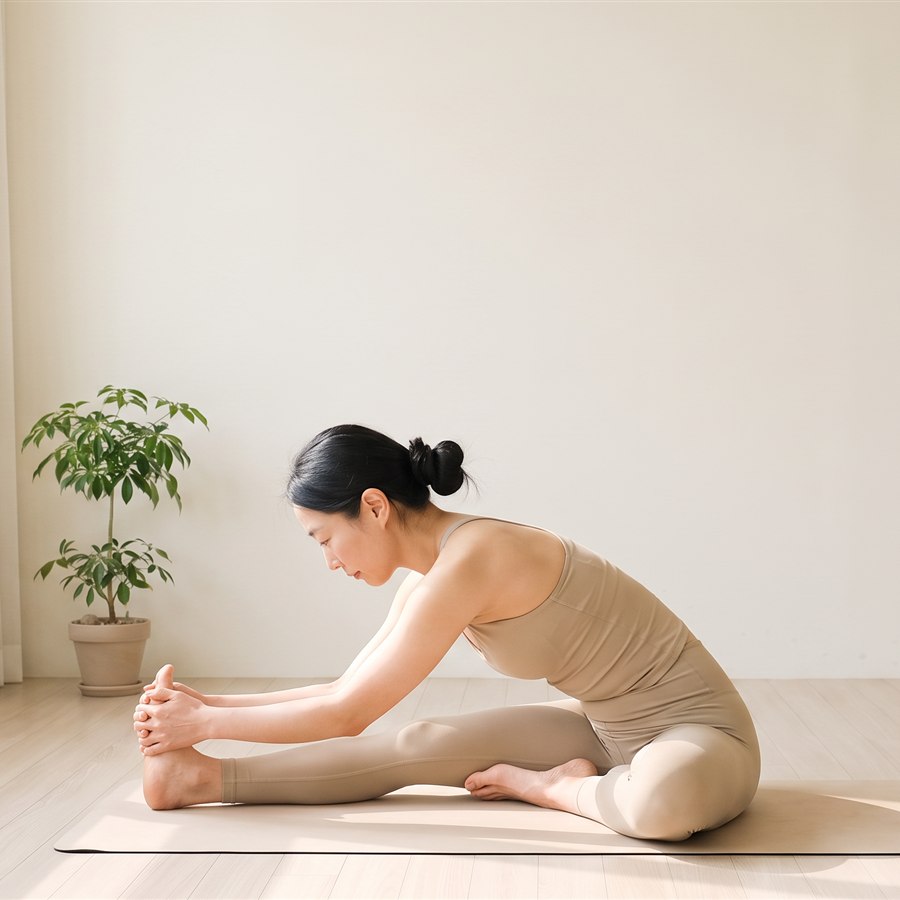
Janu Sirsasana - bent knee open at about ninety degrees, both hands clasping the extended foot
What is Janu Sirsasana A?
Janu means knee, sirsa means head, asana means seat or posture: head-to-knee pose. The name describes the finished picture rather than the work, which is a little misleading, because beginners who chase the head often lose the part of the pose that matters. What you are really building is a long fold over one straight leg while the other hip opens outward and stays heavy on the floor.
Practitioners usually notice three things over a few weeks of practising it. The hamstring and calf of the straight leg lengthen more willingly than in the two-legged fold, because one leg at a time is simply easier to negotiate with. The groin and inner thigh of the bent leg begin to soften. And the asymmetry teaches you something useful about your own body: almost everyone has one side that folds and one side that argues, and this is the pose where you first meet that difference honestly.
The 90-degree knee
Everything in this posture is decided before you fold. Sit in Dandasana, then bend your right knee and draw the right heel in toward the perineum, letting the right knee travel out to the side. The angle between your two thighs should be roughly 90 degrees — not the tight tuck of a cross-legged seat, and not splayed flat out to the side either.
Check three things. The right heel sits close to the groin, not out by the inner knee. The sole of the right foot touches the inner left thigh. And the right knee rests toward the floor without being pressed there. If the knee floats high, that is information about your hip, not a failure — leave it floating.
Step-by-step: getting into the pose
- From Dandasana, inhale and bend the right knee, drawing the heel toward the groin and letting the knee open out to the right.
- Keep the left leg straight and active: flex the toes back toward you, press the back of the left thigh down, and keep the left kneecap pointing at the ceiling.
- Inhale, lift both arms and lengthen the spine upward, turning your chest slightly to face the left leg so you fold along the leg rather than across it.
- Exhale and fold forward from the hip joints, reaching for the left foot. Clasp the foot with both hands, or hold the shin or ankle instead.
- Inhale, lift the chest and lengthen the front of the body, looking forward for a moment.
- Exhale and settle: elbows bend out to the sides, chin moves past the shin, forehead or chin reaches toward the knee. Stay five breaths.
- Inhale, lift the head and straighten the arms. Exhale, release. Then take the vinyasa and repeat everything on the second side, bending the left knee.
The turn in step 3 is the step most beginners skip, and it is the one that makes the pose work. Without it you fold into the gap between your legs and the straight leg never really lengthens.
Breath and gaze (drishti)
The breath pattern is the one you learned in the sun salutations, applied to a longer stay. Lengthening movements ride an inhale; folding movements ride an exhale. Once you are in the posture, keep the ujjayi breath steady and audible for five full cycles and let each exhale do the deepening, rather than pulling with your arms.
If the sound of your breath thins out or disappears, you have gone past the edge of what this shape can currently hold. Come out a little until the breath returns. That is not a compromise; in Ashtanga the breath is the instrument that tells you how deep is deep enough today.
The drishti is padhayoragrai — the toes of the extended foot. In the fold your face may end up close to your own shin, so the gaze becomes soft rather than literal. Keep it directed toward the foot and resist the common habit of turning your head sideways to rest a cheek on the leg, which twists the neck and interrupts the line of the spine.
Common mistakes
Rounding from the waist to reach the foot. If the hands arrive at the foot but the lower back has rounded into a C, the fold is happening in your lumbar spine instead of your hip joints. Fix it by holding your shin instead of your foot, lifting the chest, and folding again from lower down — the hip creases, not the belly.
Letting the bent-leg hip lift off the floor. This is the most common fault in the pose, and it is almost invisible from the inside. As you fold, the bent-knee side quietly lifts and the pelvis tips. Press that sitting bone down deliberately as you exhale; you may fold less far, and the pose will immediately feel more honest.
Pushing the bent knee toward the floor with a hand. The hip opens with time, not pressure, and forcing the knee down loads the inner knee joint rather than the hip. Let the knee be wherever it is.
Collapsing the straight leg. When attention goes to the fold, the extended leg often goes soft, the foot rolls outward and the knee drifts. Keep the toes flexed back, the kneecap facing up and the thigh engaged throughout.
Beginner modifications
If your hands do not reach the foot, use a strap looped around the ball of the extended foot and hold it with both hands, arms straight and chest lifted. The strap lets you keep a long spine while the hamstrings do their slow work, which is a far better trade than a rounded back and a hand on the toes.
If you sit back on your tailbone the moment you bend the knee, sit on a folded blanket or a firm cushion. Lifting the pelvis an inch or two tilts it forward and gives the fold somewhere to go. Almost every stiff-hipped beginner folds deeper on a blanket than off it.
If the bent knee or the inner groin complains, slide the bent heel slightly further from the groin and support the knee on a rolled towel or a block. And if the hamstring of the straight leg feels sharp rather than stretched, bend that knee a little — a bent knee with a long spine is a real version of this pose, while a straight knee with a collapsed back is not.
When to be careful
Knee injuries deserve the most caution here, because the bent leg combines deep flexion with outward rotation. If you have had meniscus or ligament trouble, keep the knee higher, widen the angle, and stop at the first sharp sensation. Sharp or pinching knee pain is always a signal to come out, not to breathe through.
With a lower-back injury or disc problem, keep the spine long and the fold shallow, and work with the strap rather than reaching for the foot. In later pregnancy, take the bent knee wider and fold only to a comfortable depth so there is no compression at the front of the body. Hamstring strains need patience rather than depth — practise with a bent knee until the tissue tolerates length again.
🧘 Want to practice this pose right now? Open our interactive guide with photos, alignment details and a breath timer: Ashtanga Shala Practice Guide.
Give this pose a few weeks before you judge it. The fold deepens slowly, but the lesson arrives early: the bent-leg hip stays down, the straight leg stays alive, and the breath decides how far you go. In the next post we move on to Head-to-Knee Pose B and C (Janu Sirsasana B & C), where the heel placement changes and the pose asks a new kind of attention from your foot and your knee.
This post is general guidance, not medical advice. If you have an injury or health condition, check with a professional before practicing.


