Wide-Legged Forward Fold A & B (Prasarita Padottanasana): Crown to the Floor Without Forcing
Prasarita Padottanasana is the moment the standing sequence finally lets you breathe. After five poses balanced on a narrow base and twisted against it, you step your feet wide, let your head hang, and stay. It is the first standing pose in the Ashtanga Primary Series where a beginner can feel genuinely comfortable — which is exactly why it is the one people rush through.
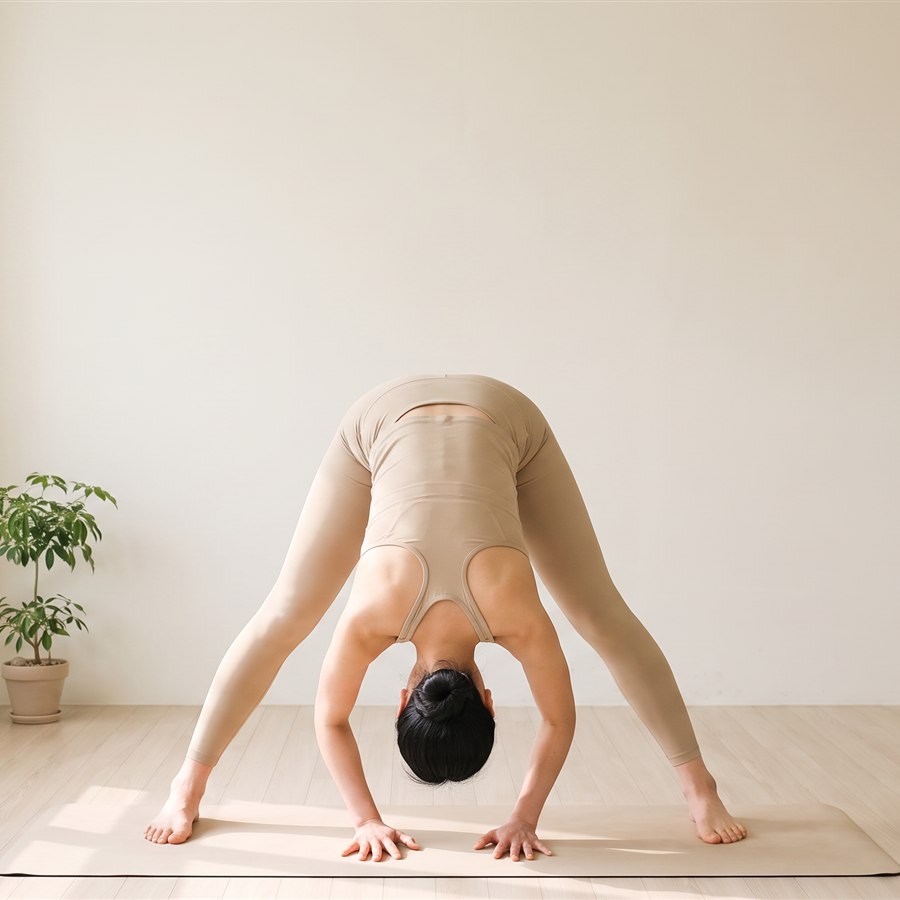
Prasarita Padottanasana - feet parallel and wide, hands under the shoulders, crown reaching toward the floor
What is Prasarita Padottanasana?
The Sanskrit name is a plain description of what you are doing. Prasarita means spread out or expanded, pada is foot, ut means intense, and tan means to stretch: an intense stretch with the feet spread wide. Nothing mystical, just an accurate label.
There are four versions — A, B, C and D — practiced one after another with only a few breaths between them. They share the same stance and the same fold, and differ only in what the arms do. Today we take A and B; C and D come tomorrow.
What practitioners commonly notice is a long, even stretch through the hamstrings and the inner thighs, a spine that feels less compressed than it did five poses ago, and the particular quiet that comes from having the head below the heart for five slow breaths.
Setting up the stance
Everything in this pose depends on the feet. Get the stance wrong and no amount of effort will bring your head anywhere useful.
- From Samasthiti at the front of your mat, inhale and turn to your right so you face the long edge of the mat, stepping or lightly hopping the feet apart as you turn.
- Set the feet about a leg's length apart — roughly one metre for most people. A useful check: your ankles should sit under your wrists when you open the arms out to the sides.
- Turn the toes very slightly inward, so the outer edges of the feet are parallel to the short edges of the mat. This small internal rotation protects the knees and lets the fold come from the hips.
- Press down through the big-toe mounds and the outer heels at the same time, and feel the arches lift a little. Lift the kneecaps by engaging the thighs. The legs should feel awake, not locked.
- Place the hands on the waist, lengthen up through the spine, and take one breath here before you fold.
Prasarita Padottanasana A: step by step
In the counted method A takes five vinyasas. As a beginner, count the breaths rather than the numbers; the numbers will arrive on their own once the shape is familiar.
- Inhale — hands on the waist, lift the chest, look slightly up. The spine gets long before it goes anywhere else.
- Exhale — hinge forward from the hip creases, not the waist, and bring both hands to the floor shoulder-width apart, fingers in line with the toes.
- Inhale — straighten the arms, lift the chest, and look forward with a flat back. This is the position that teaches the pose: a long spine, not a deep one.
- Exhale — bend the elbows straight back, draw them toward each other, and lower the crown of the head toward the floor between the hands. Stay for five slow breaths.
- Inhale — straighten the arms and lift the head again, flat back. Exhale, hands to the waist. Inhale, come all the way up with a long spine.
The crown of the head is the target, not the forehead and not the nose. If it does not reach the floor today, it does not matter — the shape is correct as soon as the elbows point straight back and the weight stays forward in the feet.
Prasarita Padottanasana B: step by step
B keeps the hands on the waist the whole time, which removes the safety net of the arms. Suddenly the fold has to come from the hips and the legs alone, and most people discover they were quietly leaning on their hands in A.
- Inhale — hands on the waist, thumbs at the back, elbows drawing toward each other. Lift the chest and look up.
- Exhale — fold forward from the hip creases with the spine long, taking the torso down as far as it goes without rounding hard through the lower back. Stay for five breaths.
- Inhale — come back up with the same long spine, chest leading, hands still on the waist.
- Exhale — stand tall and settle before moving on.
Keep the hips stacked over the ankles as you fold. The instinct is to send the hips backward like a squat; resist it, and the hamstrings get the work they came for.
It is the same hinge you already know
If the fold feels mysterious, go back to Uttanasana — the standing forward fold you meet in every Surya Namaskara A. The action is identical: the top of the thigh bones move back, the sitting bones lift, and the torso rotates over the hip joints like a door on a hinge. The only difference here is that the feet are wide, which means the stretch spreads across the inner thighs as well as the backs of the legs.
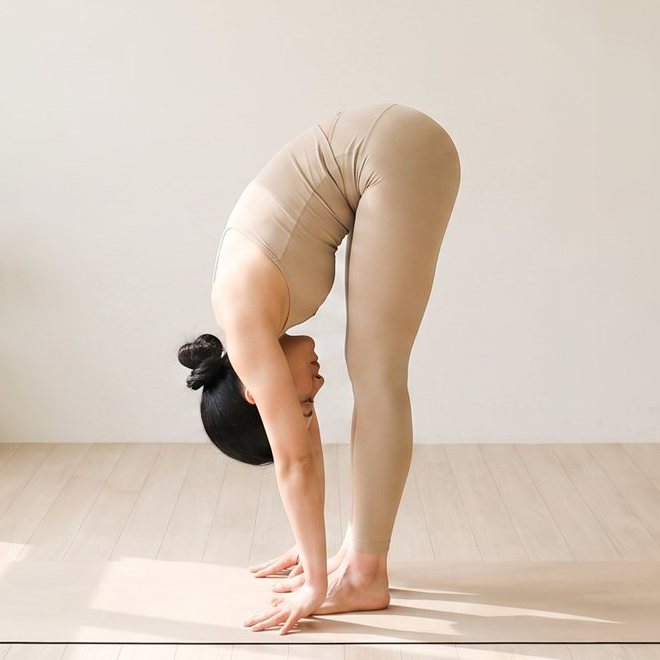
Uttanasana - folding from the hip creases with a long spine - the same hinge, feet together
Breath and gaze (drishti)
Ujjayi breathing continues exactly as in the rest of the standing sequence: a soft narrowing at the throat, an audible but unforced sound, and inhales and exhales of roughly equal length. In the fold, the belly has less room than usual, so let the breath move into the back and the sides of the ribs. If the sound becomes strained or you find yourself holding your breath, you have gone deeper than your body is ready for — come up an inch and the breath returns.
The drishti for both A and B is nasagrai, the tip of the nose. Upside down this simply means letting the gaze rest softly toward the nose rather than looking at your feet or at the room behind you. In the flat-back position on the inhale, the gaze goes forward to the horizon, or to the third-eye point as your neck allows.
Common mistakes
Standing too wide. A very wide stance looks impressive and makes the hips harder to fold from, not easier. If your feet slide out or your inner thighs cramp, bring them in by a hand's width.
Weight falling into the heels. As the head goes down, most beginners drift backward. Shift a little weight into the balls of the feet so that a line drops from the hips through the ankles — the fold immediately gets deeper for free.
Elbows flaring out. In A, wide elbows turn the pose into a shoulder shrug and stall the descent of the head. Draw them back and in, roughly over the wrists, and let the shoulders slide away from the ears.
Forcing the head to the floor. Rounding the upper back to reach the mat with the forehead does not deepen anything; it just compresses the neck. Keep the length in the spine and let the floor come to you over months.
Beginner modifications
If your hands do not reach the floor comfortably in A, put them on two blocks, on a stack of books, or on a chair seat, and work the flat-back position from there. Everything the pose teaches is available at that height.
Tight hamstrings are the usual limit. Bend the knees generously — enough that the fold is happening at the hip creases — and over time let them straighten as the backs of the legs allow. A soft knee with a long spine is worth far more than a straight knee with a rounded back.
In B, if the lower back complains, keep the fold shallow and stop at the point where the spine is still long. If shoulders make the waist grip awkward, cross the arms and hold the opposite elbows behind your back instead.
When to be careful
This pose puts the head below the heart. If you have high or low blood pressure, glaucoma, a recent eye or ear condition, or you get dizzy when you stand up quickly, keep the fold shallower and come up slowly on an inhale rather than snapping upright. Anyone with a lower-back injury should keep the knees bent and prioritise a long spine over depth, and those with hamstring strains should back off well before the sharp end of the stretch. In later pregnancy the wide stance is often welcome, but the deep fold is not — practise with the hands on a chair and the torso high.
Discomfort in the belly of a muscle is normal; sharp pain at a joint or at the sitting bones is a signal to stop.
🧘 Want to practice this pose right now? Open our interactive guide with photos, alignment details and a breath timer: Ashtanga Shala Practice Guide.
Give A and B a few weeks before you judge them. They are the resting point of the standing sequence, and learning to actually rest inside effort is a skill the rest of the series will keep asking for. Tomorrow we finish the set with Prasarita Padottanasana C and D, where the arms come into the picture and the shoulders finally get their turn.
This post is general guidance, not medical advice. If you have an injury or health condition, check with a professional before practicing.


