Reverse Plank (Purvattanasana): The Counter-Pose That Teaches You to Undo
For three long rounds you have been folding forward. Your hamstrings have been complaining, your spine has been rounding toward your shins, and the whole front of your body has been quietly closing. Then the count says inhale, your hands go behind your hips, and you lift into the opposite shape entirely. That shape is Purvattanasana, and it is the first place in the Ashtanga Primary Series where the practice openly teaches you a habit that matters more than any single posture: what goes one way must, shortly afterwards, go the other.
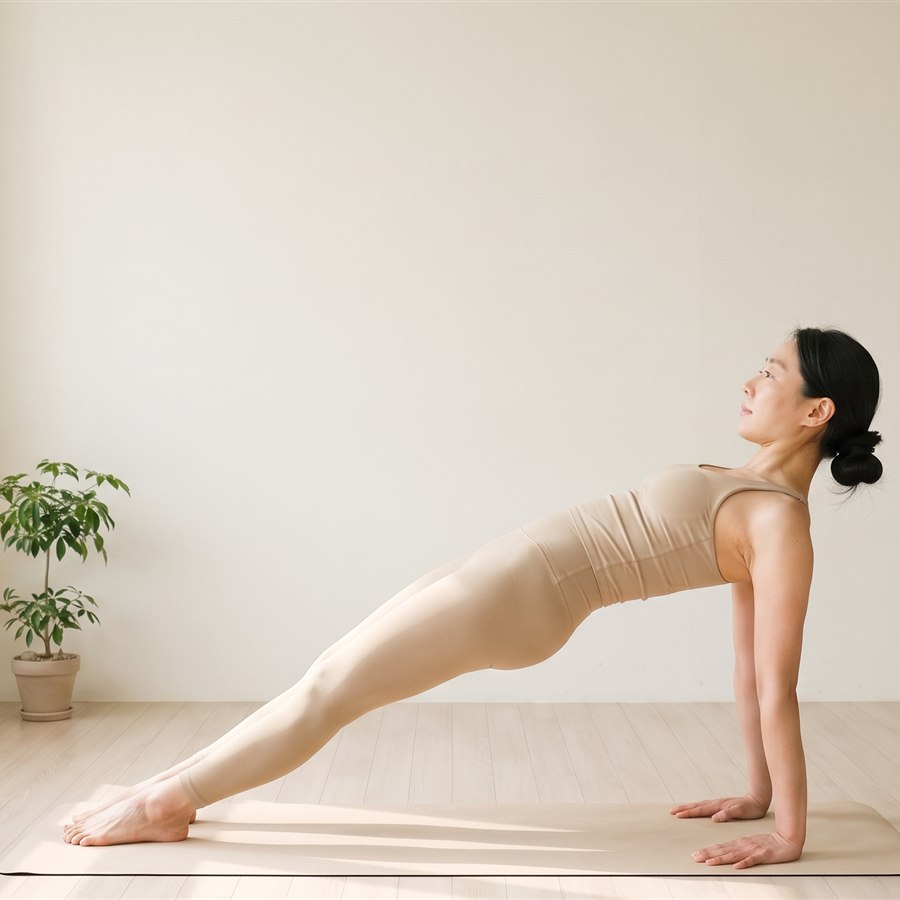
Purvattanasana - hips lifted, legs straight and together, chest opening toward the ceiling
What is Purvattanasana?
The name is built from three pieces. Purva means east, or front. Tan means to stretch or extend intensely. Asana is the seat or posture. So Purvattanasana is the intense stretch of the east side of the body — and the east side is the front, because the traditional practitioner faces the rising sun. The pose you have just left, Paschimottanasana, is named the same way: paschima means west, the back of the body. Two poses, two directions, one pair.
In English the shape is usually called Reverse Plank or Upward Plank. That name tells you what the body is doing: a long straight line from heels to shoulders, held up by the hands and the feet, with the chest lifted and the hips as high as you can honestly lift them. What practitioners commonly notice is a strong opening across the chest and the front of the shoulders, real work in the backs of the legs and the muscles along the spine, and a surprising amount of effort in the wrists and triceps for a pose that looks passive in photographs.
It also does something the series needs. After the deep forward folding of Dandasana and Paschimottanasana, the front of the torso is compressed and the shoulders have been rolling forward. Purvattanasana asks for the exact reverse: shoulders drawing back, sternum rising, hip flexors lengthening. That is why it sits where it sits.
Step by step: getting into the pose
You arrive here from Dandasana, the staff-pose seat you learned two posts ago. The count is simple — one inhale takes you up, five breaths hold, one exhale brings you down — but the setup before that inhale decides whether the pose feels strong or sore.
- Sit in Dandasana with your legs straight and together, spine tall.
- Place your hands on the mat roughly one hand-length behind your hips, shoulder-width apart, with your fingers pointing toward your feet. Not out to the sides, not backwards — toward your feet.
- Spread your fingers and press the base of the index finger down, the same grounding cue you use in Downward Dog.
- Bring your big toes together and point your feet, so the tops of the feet reach toward the mat.
- Inhale and press firmly down through both hands as you lift your hips. Think of the hips travelling up and slightly forward rather than just up.
- Keep your legs completely straight and squeezing together, and reach through the toes until the soles of your feet, or at least the outer edges, meet the floor.
- Draw your shoulder blades toward each other and lift your sternum. The chest opens because the shoulders move back, not because the ribs are thrown forward.
- Only then let your head release back, if your neck is comfortable. Hold five breaths, then exhale and lower your hips to the mat, returning to Dandasana.
The order of steps seven and eight is the whole pose. Beginners almost always reverse them.
Breath and gaze (drishti)
Keep the ujjayi breath you built in the early posts: a soft narrowing at the throat, the same audible sound on the way in and on the way out, nothing forced. Purvattanasana is a pose where the breath tends to disappear, because the arms are working and the chest is already stretched wide. If you find yourself holding your breath, that is your signal to lower the hips slightly rather than to push harder.
For the gaze, most teachers give Nasagrai drishti — the tip of the nose — with the head released back so the eyes travel up along the line of the nose. If your neck protests, or if dropping the head back makes you dizzy, keep the head in line with the spine and look softly upward instead. A steady gaze you can actually hold for five breaths is worth more than the traditional one held badly for two.
Common mistakes
Hands too far back, or fingers turned outward. This is the most common cause of wrist and shoulder pain here. The further behind you the hands go, the more the shoulder joint is forced into extension while bearing weight. Fix it by moving the hands closer — about one hand-length behind the hips — and turning the fingers to point at your feet.
Sagging hips and bending knees. The pose collapses into a hover, the lower back takes the strain, and nothing opens. Fix it by pressing down hard through the heels of the hands, squeezing the legs together as though holding a sheet of paper between the thighs, and lifting from the pubic bone rather than from the chest.
Leading with the head. Throwing the head back first feels like a backbend and produces almost none of one. It also compresses the back of the neck. Lift the chest first, let the head follow last, and keep the throat soft.
Forcing the feet flat. Getting the soles down is a result of the hips being high and the ankles being open, not a target to chase on day one. Press through pointed toes, accept whatever contact the feet make, and let it change over months.
Beginner modifications
If the full shape is out of reach today — and for most beginners it is — practise one of these honestly rather than a bad version of the pose.
- Bent-knee table top. Set your feet flat on the mat, knees bent about ninety degrees, then lift the hips. You get almost all of the chest and shoulder opening with none of the hamstring and wrist load. This is the single best substitute.
- Hands on blocks. Two low blocks behind you raise the floor, which reduces how far the shoulders have to extend. Wrists usually feel immediately better.
- Hips barely lifted, three breaths. Lift only until you feel the chest open, hold for three breaths instead of five, and lower. Three good breaths beat five collapsed ones.
- Fists instead of palms. If your wrists are the limit, make loose fists and press down through the knuckles with the wrists straight.
Where this action leads later in the series
The mechanics you are rehearsing here — hands pressing down behind you, shoulders opening, hips driving up, legs straight and strong — come back much later in the Primary Series as Urdhva Dhanurasana, the upward bow. That pose asks for the same three things at once: weight into the hands, shoulders extending overhead, and a hip lift powered by the legs rather than yanked from the lower back. Practitioners who rush Purvattanasana for a year usually find the backbends harder than they need to be, which is a good reason to treat these five breaths as training rather than as a pause between forward folds.
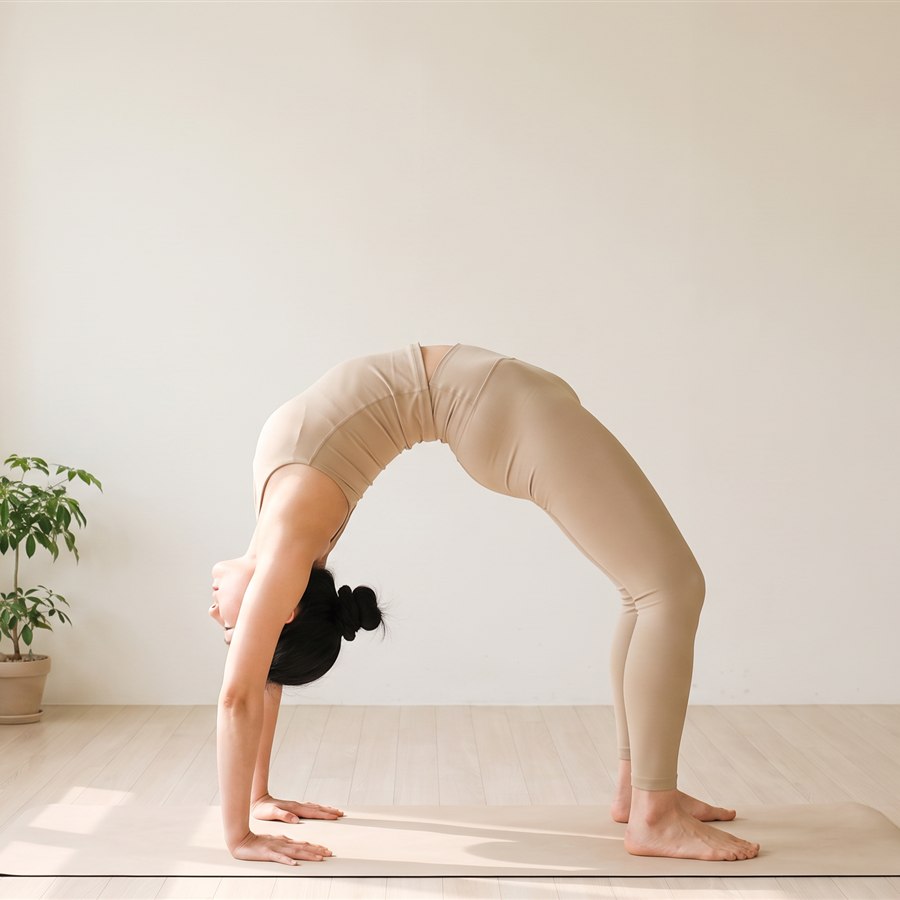
Urdhva Dhanurasana - hands and feet pressing down as the chest lifts and the hips rise
When to be careful
Purvattanasana loads the wrists and the front of the shoulders more than almost anything you have met so far. If you have a wrist injury, carpal tunnel symptoms, or shoulder instability, use the bent-knee version with blocks or skip the pose and simply sit tall for five breaths. If your neck is sensitive, keep the head up. Dropping the head back can also cause light-headedness if you have blood-pressure issues, so if that happens, come down and try again with the head in line with the spine. In later pregnancy the full pose is generally not appropriate, and a bent-knee lift with the hands well supported is the usual alternative. As always, discomfort that sharpens or radiates is a reason to come out, not to breathe through.
Practising the pair
For the next week, practise Paschimottanasana and Purvattanasana as one unit rather than two entries on a list. Fold, then lift. Close the front, then open it. Beginners who build this reflex early tend to find the rest of the seated sequence far kinder on their lower back, because the body never spends twenty minutes in one direction. This is what Ashtanga means by a counter-pose: not a stretch you do if there is time, but the other half of the movement.
🧘 Want to practice this pose right now? Open our interactive guide with photos, alignment details and a breath timer: Ashtanga Shala Practice Guide.
In the next post we move on to Ardha Baddha Padma Paschimottanasana, the half-bound lotus forward fold — the first seated pose that asks a knee to rotate into lotus, and the first place where knowing when to skip a shape matters more than achieving it.
This post is general guidance, not medical advice. If you have an injury or health condition, check with a professional before practicing.


