Extended Side Angle (Utthita Parsvakonasana): The Art of Grounding the Back Foot
After Extended Triangle teaches you to hinge and reach, Extended Side Angle asks for something harder: a bent front knee, a straight line from heel to fingertips, and a back foot that has to stay glued to the mat while everything else stretches away from it. This is the pose in the standing sequence where "grounding" stops being an abstract cue and becomes something you can actually feel.
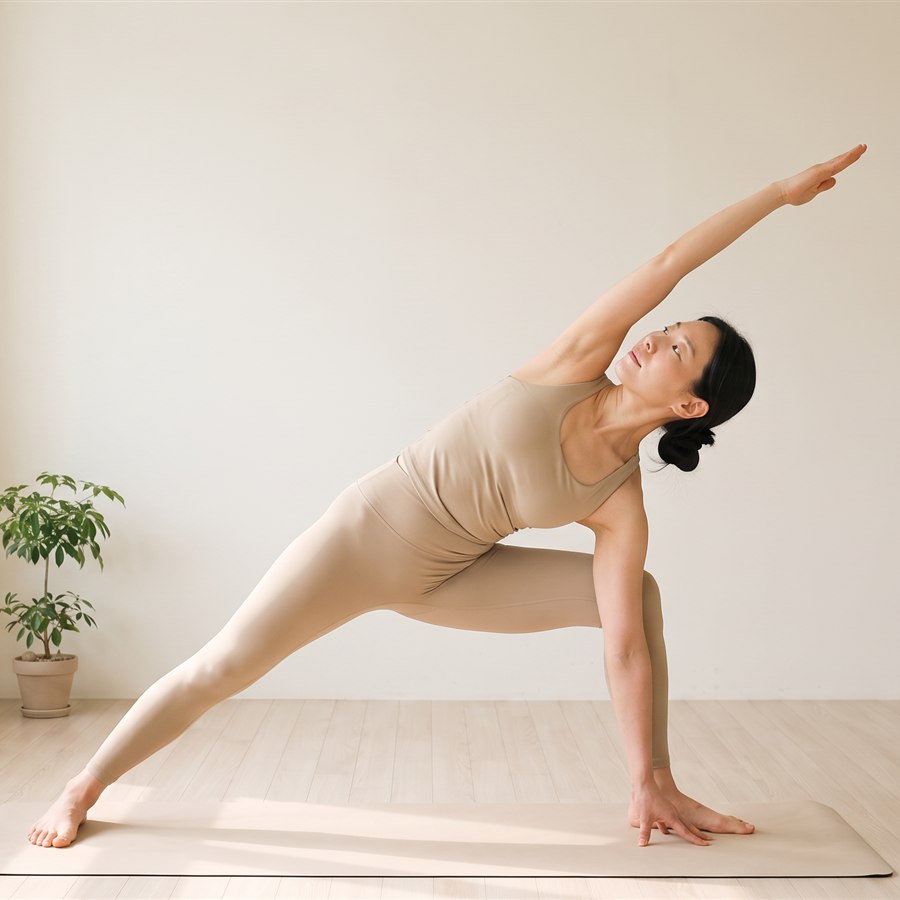
Utthita Parsvakonasana - front knee bent to ankle line, torso extended over the front leg, top arm reaching over the ear, back foot pressed flat and turned in
What is Utthita Parsvakonasana?
Utthita means extended, parsva means side or flank, and kona means angle. Put together, Utthita Parsvakonasana is the "extended side angle pose" — a standing lunge that opens the entire side body, from the outer ankle of the back leg all the way through the fingertips of the top arm. Where Trikonasana keeps both legs straight, Parsvakonasana bends the front knee, which changes almost everything: the hips sink lower, the stretch through the back leg's inner line intensifies, and the pose starts to build real strength in the standing thigh, not just flexibility.
It comes right after Extended Triangle in the Ashtanga standing sequence, and the two poses are often taught as a pair, because Parsvakonasana takes the same wide stance and side-bending shape and adds load-bearing work to it. Where Trikonasana is mostly about length, Parsvakonasana is about length and effort at the same time — the front thigh has to keep working the entire time you hold the shape, which is exactly why it tends to feel much more tiring on the first few tries than Triangle did.
Physically, this is one of the poses that starts teaching your legs what the rest of the standing sequence will keep asking for: a stable base under a moving, extending upper body. Mentally, it is a good early test of patience, because the temptation to sink deeper than your hips are ready for is strong, and the pose rewards restraint more than ambition.
Step-by-step: getting into the pose
- From Samasthiti, inhale and jump or step your feet wide apart, about a leg's-length, arms reaching out to shoulder height.
- Turn your right foot out 90 degrees and your left foot in slightly, roughly 15 degrees. Your right heel should line up with the arch of your left foot.
- Exhale and bend your right knee until your shin is vertical and your knee stacks directly over your ankle — not past your toes.
- Reach your right hand down to the floor, or to a block, on the outside of your right foot. Keep your chest open rather than letting it collapse toward the thigh.
- Sweep your left arm up and over your left ear, so your body forms one long diagonal line from the outer edge of your back foot to your left fingertips.
- Press the outer edge of your back (left) foot firmly into the mat — this is the anchor that lets the rest of the pose lengthen safely.
- Stay for five breaths, then inhale back to standing and repeat on the left side, or vinyasa through Chaturanga, Upward Dog and Downward Dog between sides if that is part of your practice.
Breath and gaze (drishti)
The drishti for Utthita Parsvakonasana is hastagrai — the gaze toward the top hand's fingertips. Turning your head to look up and along your extended arm helps rotate the chest open instead of letting it drop toward the floor. Keep the ujjayi breath steady and audible; five even breaths here is plenty, and it is far more useful than one long, held, breath-holding stretch. If your breath gets ragged, that is usually a sign the front knee has gone too far past 90 degrees and you're bracing rather than breathing.
Common mistakes
- Letting the back heel lift. The whole pose loses its foundation if the back foot rolls onto its toes. Fix: turn the back foot in a touch more, and consciously press the outer edge down before you go deeper into the front knee.
- Collapsing the chest toward the front thigh. This closes the side body instead of opening it. Fix: think of drawing the bottom shoulder back and the top shoulder further back still, stacking them on one plane.
- Letting the front knee cave inward. This puts sideways strain on the knee joint. Fix: actively press the knee toward the little-toe side of the front foot, in line with the second or third toe.
- Reaching for the floor before the hips are ready. Forcing the bottom hand down often bends the whole spine sideways instead of lengthening it. Fix: rest the hand on a block, or on the shin, until the hips open enough for the floor to come naturally.
One useful comparison: the front leg here is doing almost exactly the same job it does in Warrior II, which shows up later in the standing sequence.
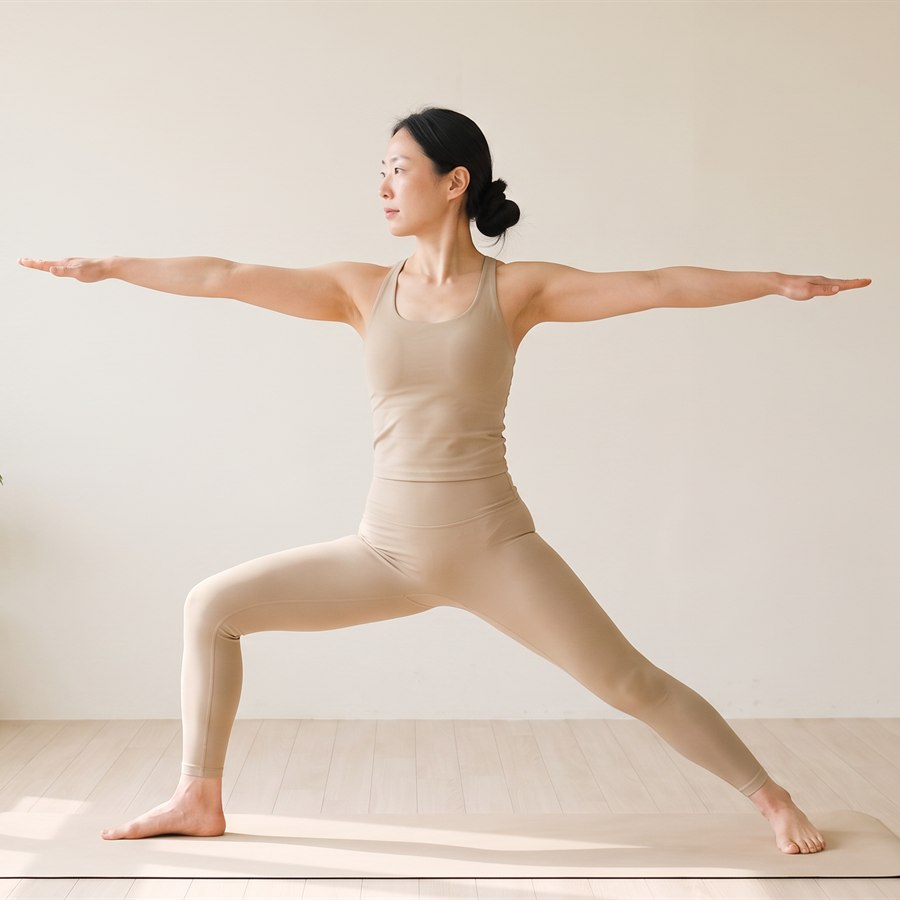
Virabhadrasana B - front knee bent to ankle line in a wide lunge stance, back leg straight and grounded, arms extended parallel to the floor
Same 90-degree front knee, same rooted back foot, same long line through the hips — the only real difference in Parsvakonasana is that the torso tips sideways over the front leg instead of staying upright between the arms. If Warrior II ever feels stable for you, borrow that same leg feeling here.
Beginner modifications
Tight hips or a short hamstring on the front leg are completely normal at this stage, and there is no need to force the bottom hand to the floor. A block under the hand raises the floor to meet you. If reaching the arm overhead pulls your shoulder out of a comfortable line, you can instead rest your top hand lightly on your hip and keep the gaze forward rather than up — this still opens the side body without straining the neck. If five breaths in the full shape is too much for the front knee, come up to standing between breaths and re-enter rather than gripping through discomfort.
Another honest option: shallow the front knee bend to something closer to 45 degrees for the first weeks. A smaller bend with good alignment builds far more useful strength than a deep bend with a collapsing chest or a lifting heel. The depth will come on its own as your hips and ankles adapt — there is no benefit to rushing it.
When to be careful
Go gently, or skip the deep knee bend for now, if you have an existing knee injury, groin strain, or hip impingement — a shallower stance with a less-bent front knee still gives you the side stretch without the joint load. If you have low blood pressure and feel lightheaded coming up from the low position, rise slowly rather than snapping upright. As always, this pose is not appropriate to push through sharp or pinching pain; a dull stretch is expected, a sharp pain is not.
🧘 Want to practice this pose right now? Open our interactive guide with photos, alignment details and a breath timer: Ashtanga Shala Practice Guide.
Extended Side Angle is the deepest stretch the standing sequence has asked of you so far — tomorrow it gets more complicated, when Revolved Side Angle (Parivrtta Parsvakonasana) adds a twist on top of the same bent-knee foundation.
This post is general guidance, not medical advice. If you have an injury or health condition, check with a professional before practicing.


