Revolved Triangle (Parivrtta Trikonasana): The First Twist in the Ashtanga Primary Series
Yesterday, in Utthita Trikonasana, you learned that the triangle is built from the legs up. Today the Primary Series asks something new of you: Parivrtta Trikonasana, the Revolved Triangle, is the first twist in the entire practice — and the first pose that asks you to twist and balance at the same time. It is honest, humbling, and wonderfully clarifying, because it will show you exactly where your practice is today.
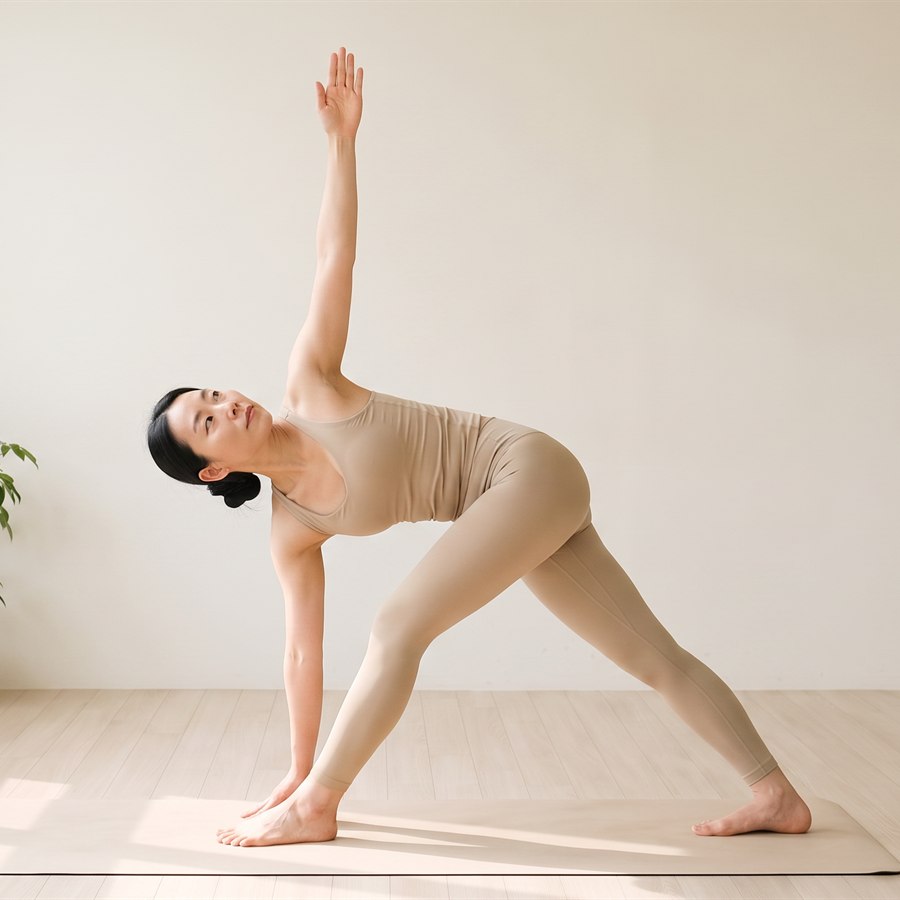
Parivrtta Trikonasana - torso revolved over the front leg, opposite hand reaching toward the floor
What Is Parivrtta Trikonasana?
The name breaks down simply: parivrtta means revolved, trikona means triangle, and asana means posture. So this is the same triangle you built yesterday, turned inside out. Instead of opening the chest toward the ceiling, you rotate it across the front leg, so that the opposite hand reaches down toward the front foot while the same-side arm rises toward the sky.
Twists like this one ask the spine to rotate evenly through its whole length rather than hinging at one spot, and practitioners commonly find they wring out tension held between the shoulder blades and through the lower back. Just as importantly, the narrow base and the crossed-over reach make this a balance pose in disguise. Most beginners wobble here. That is not failure — it is the pose working.
Step-by-Step: Getting Into the Pose
In the Ashtanga method, Parivrtta Trikonasana follows immediately after Utthita Trikonasana, using the same wide stance. Here is the right side, described slowly:
- From your wide stance, turn your right foot out 90 degrees and your left foot in strongly — about 45 degrees, more than you used for the open triangle. Your hips will want to face the front of your mat; let them.
- Ground the outer edge of your back (left) foot. This foot is your anchor for everything that follows.
- Inhale and raise your left arm overhead, lengthening the left side of your body.
- Exhale, hinge forward over the right leg with a long spine, and begin to revolve your torso to the right.
- Bring your left hand down to the outside of your right foot — or to the inside of the foot, or onto your shin, wherever it lands without collapsing your chest.
- Inhale and extend your right arm straight up, stacking it roughly over the left. Your chest now faces the right side of the room.
- Turn your head to gaze up at your right thumb, and stay for five slow breaths.
- Inhale to come up with a strong core, then repeat on the left side.
Breath and Gaze (Drishti)
Twists compress the belly, and beginners respond by holding their breath. Do the opposite. Keep the Ujjayi breath audible and steady: use each inhale to lengthen the spine a little — imagine the crown of your head reaching away from your tailbone — and each exhale to revolve a little further from the middle of your back. Length first, twist second, on every single breath cycle.
The drishti here is hastagrai — the gaze goes to the fingers of the raised hand. If looking up makes you wobble or strains your neck, gaze straight ahead at the wall, or down at your front big toe. As we covered in the earlier post on drishti, a steady gaze on an easier target always beats a wandering gaze on the "correct" one.
Common Mistakes
Four things go wrong here more than anything else:
- Twisting with the arms instead of the torso. Beginners crank the top shoulder back while the ribcage stays put. The fix: forget the arms for a moment. Set your hand down, then revolve from your navel and lower ribs first, and let the arms simply follow what the spine does.
- Letting the back heel float. The moment the back foot loses the floor, the balance goes with it. The fix: press the outer edge of the back heel down as if it were glued to the mat, and think of the twist as growing upward out of that anchored foot.
- Forcing the hand to the floor. Reaching for the ground at any cost rounds the spine and caves the chest toward the front leg — which is exactly the opposite of a twist. The fix: raise the floor. A hand on the shin or a block gives you a long spine, and a long spine is what actually twists.
- Squaring the stance like a tightrope. If your feet line up heel-to-heel as if on a single rail, you will tip over sideways all day. The fix: keep your feet on two separate tracks, hip-width apart, as though standing on train rails rather than a tightrope.
Beginner Modifications
This pose has a reputation for being unkind to beginners, but it modifies beautifully:
- Shorten your stance. A shorter distance between the feet makes both the balance and the hamstring demand smaller. You can always lengthen it next month.
- Put your bottom hand on a block or your shin. Height is not the goal; rotation is. A supported hand lets the chest stay open while the spine does its work.
- Keep both hands low. If reaching the top arm up throws you off balance, rest that hand on your sacrum and just work on the revolve. The essential action of the pose is fully present in this version.
- Practice at a wall. Standing with your back near a wall gives you instant feedback about where your hips and shoulders actually are — usually not where you think.
When to Be Careful
Skip or heavily modify this pose if you have a disc injury or acute lower-back pain — loaded twists are exactly what an irritated disc dislikes, so work with an upright or reclined twist instead until a professional clears you. If you have low blood pressure or get dizzy easily, come up slowly and pause in the upright stance before changing sides. During pregnancy, closed twists that compress the belly like this one are generally set aside in favor of gentle open twists. And if you feel any pinching in the lower back while in the pose, ease the depth of the twist immediately — a shallower, longer-spined version is doing you more good anyway.
🧘 Want to practice this pose right now? Open our interactive guide with photos, alignment details and a breath timer: Ashtanga Shala Practice Guide.
Stay patient with the wobbling — every Ashtangi who now floats through this pose spent weeks tipping out of it first. Tomorrow we bend the front knee and move on to Utthita Parsvakonasana, the Extended Side Angle, where the long line of the body finally gets to stretch from the back heel to the fingertips.
This post is general guidance, not medical advice. If you have an injury or health condition, check with a professional before practicing.


This comment has been removed by the author.
ReplyDelete